How to Do a Voiceover on iMovie (Mac and iOS)
Quick Answer:
- To do a voiceover on iMovie, open your project and position the playhead. On Mac, click the Microphone icon below the viewer, select your input device in Voiceover Options, and click Record. On iPhone, tap the + icon, select Voiceover, and tap Record.
Nowadays, recording life with pictures and videos has become easier than ever before due to the advanced lenses on smartphones, like the iPhone. Moreover, the built-in apps on iPhone and Mac make it easy to edit your multimedia files. The problem is that some users still do not understand how to use the advanced features in the preinstalled apps. Therefore, this guide explains how to do a voiceover with iMovie on iPhones and Mac computers.

Part 1. How to Record Voiceover on iMovie for Mac
For a detailed guide on adding voiceovers on Mac, we have added two guides below, which will cover the step-by-step solution on adding voiceovers on Mac with detailed instructions. We also added an option for users who want to adjust the voice input setting on Mac for a more controlled audio capture.
Step-by-Step Mac Instructions
1. Fire up the built-in video editor on your Mac, go to the Projects panel, and click the Create New button to make a new project. Next, select "Movie" from the dropdown menu.
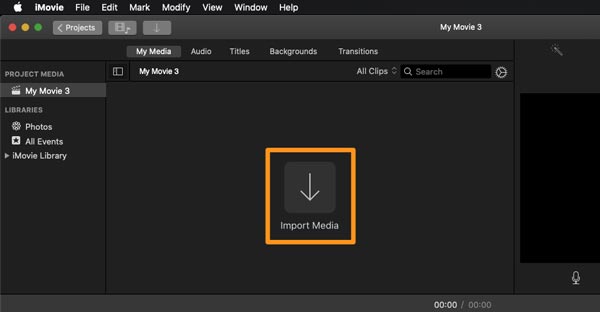
2. Click the Import Media button and open the video that you want to edit in iMovie. Then drag and drop the video onto the timeline.
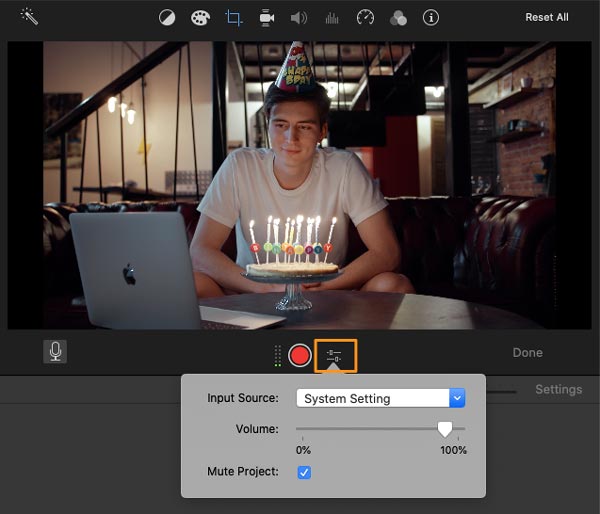
3. Next, place the playhead at the beginning point where you want to add the voiceover. Now, either click the Microphone icon at the bottom of the composition panel or choose Record Voiceover from the Window menu.

4. In the pop-up dialog, pull down the Input Source option and select your microphone, and adjust the volume. Click the red Record button and start doing a voiceover on iMovie after the countdown.
5. When the voiceover recording is done, click the Stop button under the composition panel. Your voice will be added to the timeline as a new track. Click Done at the bottom right side of the composition panel.
How to Adjust Voice Input Settings on Mac
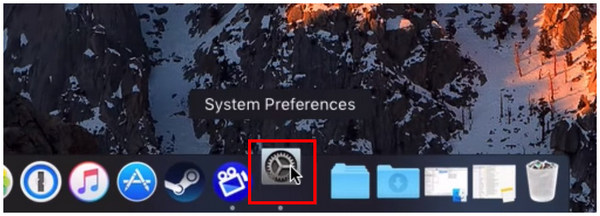
1. Open System Preferences.
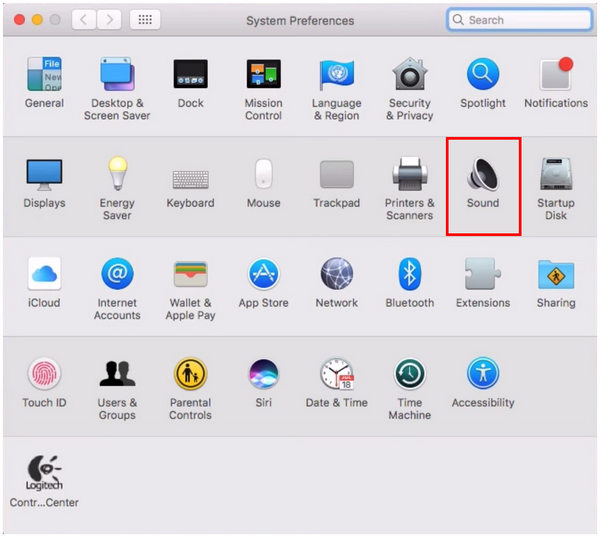
2. In the System Preferences menu, select Sound.
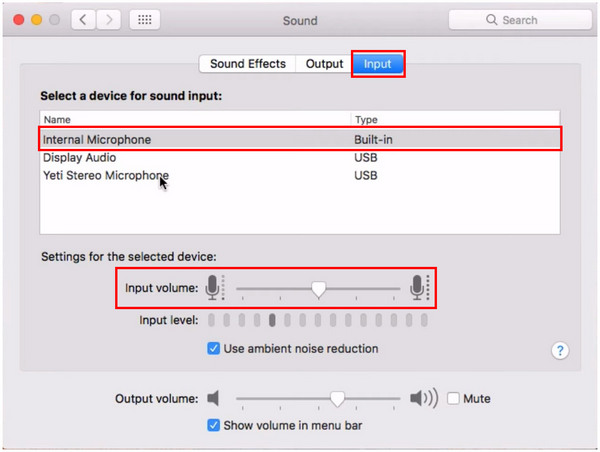
3. Inside the Sound menu, go to Input. Then, choose the input device you want to use for the voiceover. Then, you can adjust the Input Volume by editing the labeled slider.
Part 2. How to Add Voiceover on iMovie for iPhone and iPad
1. When you want to add a voiceover to iMovie on iPhone, start the preinstalled video editor app, and create a new movie project or open an existing project.
2. Tap the "+" icon, choose Video, and add the video from Camera Roll to iMovie. Preview the video on the timeline and find the beginning position of the voiceover.
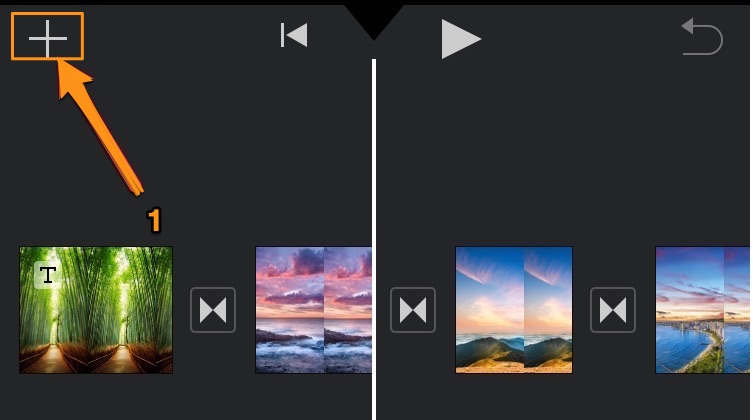
3. Tap the "+" icon at the upper left side of the timeline, and choose Voiceover on the context menu. Now, you will be presented with the Ready to Record box.
4. Test your voice and adjust the volume. Once you are ready, tap the Record button to trigger the 3-second countdown.
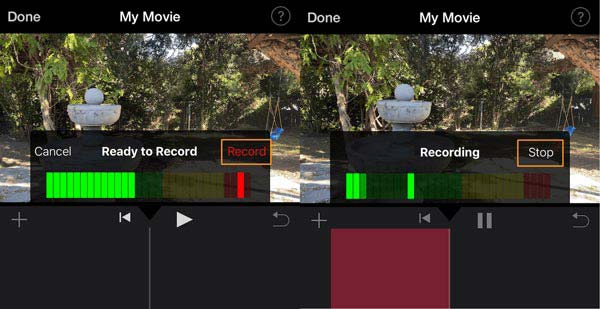
5. Then record the voiceover, and tap Stop when you are done recording. Pre-listen to the voice recording, tap Accept, and press Done.
Part 3. Bonus: How to Add AI Voiceovers to iMovie (Text-to-Speech)
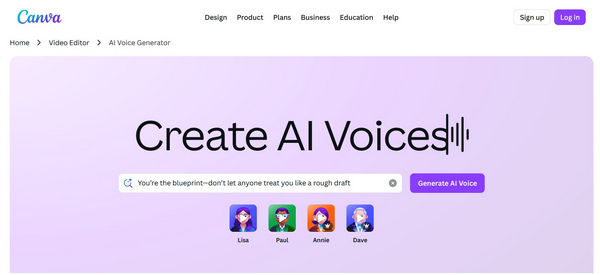
With the rise of AI, you don't always have to record your own voice. You can use AI voice generators (like ElevenLabs, Murf AI, or LOVO) to create realistic, studio-quality voiceovers and import them directly into your iMovie project.
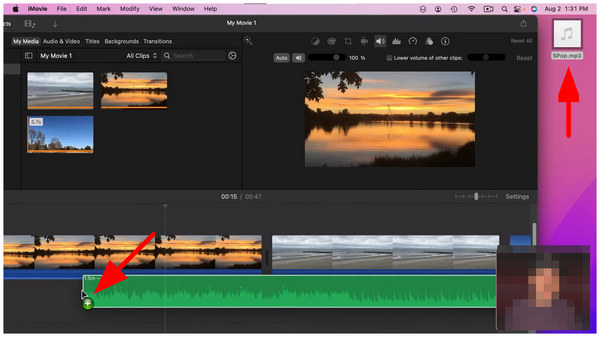
1. Generate your voiceover script in your preferred AI voice generator and export the final audio file (preferably in WAV or MP3 format).
2. Open your iMovie project on your Mac.
3. Simply drag and drop the downloaded audio file from your Finder directly into the audio track of your iMovie timeline, positioning it right below your video clip.
Part 4. Pro Tips for Crystal-Clear iMovie Voiceovers
Recording a voiceover is only half the battle; making it sound professional is the key. Follow these best practices:
Use an External Microphone
While the built-in Mac or iPhone microphone works, a dedicated USB mic drastically improves audio richness and reduces room echo.
Control Your Environment
Record in a quiet, carpeted room. Soft furnishings (like curtains or even a closet full of clothes) help absorb sound reflections.
Use iMovie’s Built-in Noise Reduction
If your recording has a subtle background hiss, select your audio clip in the timeline, click the Noise Reduction and Equalizer icon above the viewer, and check Reduce background noise. Adjust the slider until the hiss disappears without distorting your voice.
Part 5. Voiceover Not Working? How to Fix iMovie Microphone Issues
The most common reason a voiceover fails to record in iMovie (especially on newer macOS versions like Sonoma or Ventura) is a lack of microphone permissions. If you hit record and the audio meter doesn't move, here is the exact fix:
Fix 1: Grant iMovie Microphone Access
1. Close iMovie.
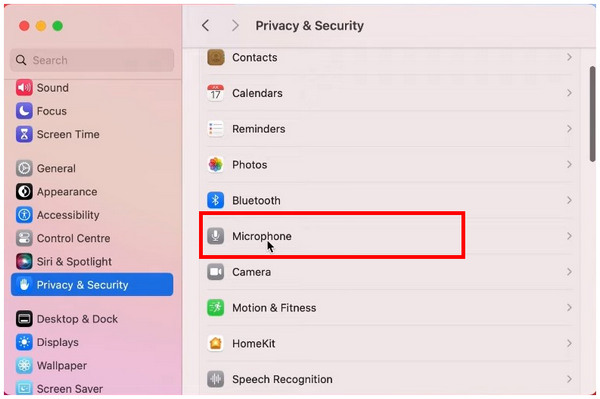
2. Click the Apple menu and select System Settings (or System Preferences).
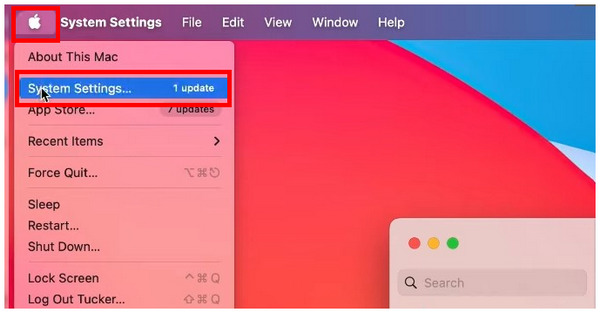
3. Scroll down and click on Privacy & Security.
4. Select Microphone.
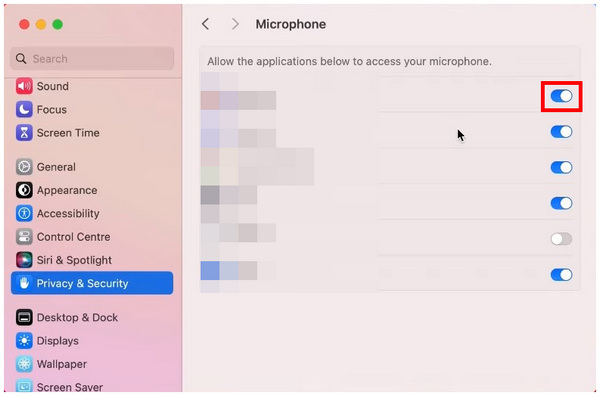
5. Find iMovie in the list of applications and toggle the switch to the ON position to grant access.
Fix 2: Check the iMovie Input Source
Even with permissions granted, iMovie might be listening to the wrong device. Click the Voiceover Options icon and ensure your correct microphone is selected.
Part 6. The Best iMovie Alternative for High-Quality Voiceovers
While iMovie is a fantastic free tool for basic voiceovers within the Apple ecosystem, it falls short if you are using a Windows PC or need to simultaneously mix internal system audio with your microphone.
For creators needing advanced audio routing, noise cancellation, or cross-platform compatibility, AnyMP4 Screen Recorder serves as a robust alternative. It allows for dedicated audio recording with granular control over background noise and microphone enhancement.
.
Main Features of the AnyMP4 Screen Recorder as an Alternative to iMovie
- Record a voiceover on Mac and Windows PCs easily
- Support both built-in and external microphones
- Make schedules to record voiceovers automatically
- Preview the video with voiceover using the built-in media player
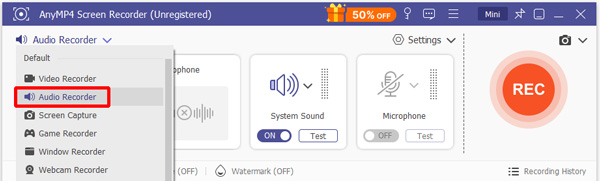
1. Install Voiceover Recorder
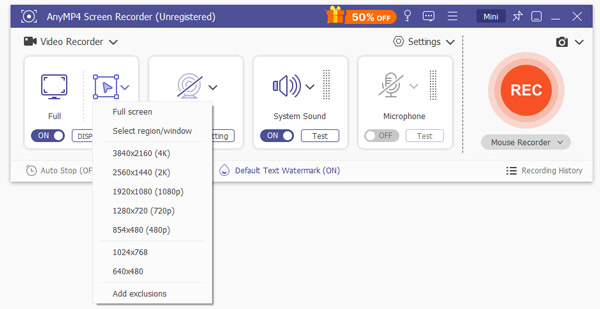
Open AnyMP4 Screen Recorder after the installation process. By default, it will be set in Video Recorder mode. If you just want to record your voice, select Audio Recorder to only record your voice.
2. Record Voiceover
Play the target video on your desktop. Turn on the voiceover recorder and set the recording area according to the video playback in the Display section. If you intend to mix the background sound and your voice, turn on both System Sound and Microphone, and adjust the volume. To mute the video while doing a voiceover, disable System Sound and enable Microphone. Play the video, click the REC button, and initiate a voiceover without iMovie.
Tips
If you intend to record a voiceover automatically, click the Take Schedule menu and set it up according to your needs.
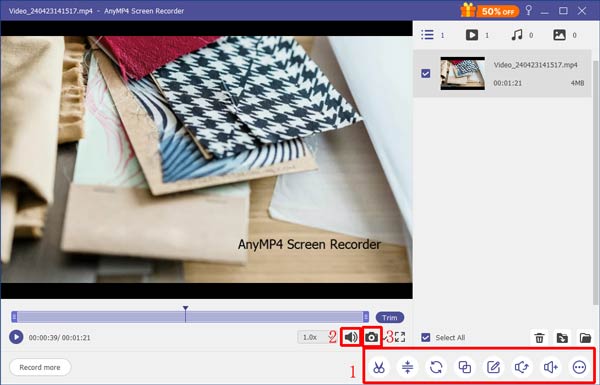
3. Save Voiceover
When the voiceover recording finishes, click the Stop button. A few seconds later, you will see the preview window. Play the video and remove unwanted frames with the Clip functionality. At last, click on the Save button if you are satisfied with the video.
Note
To change the video format, output directory, hotkeys, and more, click the gear icon in the main interface to open the Preferences dialog.
| Feature |
Apple iMovie |
AnyMP4 Screen Recorder |
| Supported Platforms |
Mac, iOS |
Windows, Mac |
| System Audio & Mic Mixing |
Limited |
Advanced |
| Scheduled Recording |
No |
Yes |
| Noise Cancellation |
Basic |
Advanced |
| Best For |
Basic editing on Apple ecosystem |
Professional voiceovers & PC users |
Part 7. FAQs About Voiceovers on iMovie
How do I permit iMovie to use my microphone on a Mac?
Open your Mac computer's settings. Then, go to Privacy & Security, then select Microphone. In the microphone settings, find iMovie and then turn on the permission toggle beside it.
How do I adjust the volume of a voiceover in iMovie?
Select the audio on the iMovie timeline. Then, select Audio Settings in the Advanced Tools. Adjust the volume slider to the left to reduce volume and move to the right to increase volume.
How to fix the iMovie voiceover recording's silent audio?
Your voice recording may have low volume and may not be silent. Make sure to check if your added audio is only unmuted. Select it, and then go to audio settings, then adjust the slider to the right to increase the volume.
Why does voiceover not work in iMovie?
You might have a corrupt preference. Open iMovie while holding down the Option and Command keys on your keyboard. Then delete preferences in the box that appears. You can also check your microphone when the voiceover does not work.
How to add a voiceover file in iMovie?
In the iMovie project on Mac, click the Add Media icon, choose Audio, and add the voiceover file to the project. When it comes to iMovie on iPhone, tap the "+" icon, select "Audio," and overlay the voiceover to the video project.
Can I talk over a video?
The easiest way to talk over a video is by doing a voiceover for the video. You can open a video in iMovie or a video editor and use the Voiceover feature to talk over a video. Make sure to uncheck Mute Project.
Conclusion
Now, you should understand how to add a voiceover to a video using iMovie on both iPhone and Mac. It is not very difficult if you follow our steps. If you do not like iMovie or it is not available to you, try AnyMP4 Screen Recorder directly, which is a professional tool to record voice-over music. If you encounter other problems when using iMovie, please leave a message below this post, and we will reply to it quickly.